reCAPTCHA v3 with NextJS
Spam and other types of automated abuse are issues that all website owners struggle to cope with. In order to protect the forms on your website, you should make it difficult, if not impossible, to fill out or submit the form by an automated tool while still making it possible for your customers to fill out the form as easily as possible. There are many ways to combat spam and we are going to implement one of them, reCAPTCHA v3, with NextJS. The functionality will be implemented without any external package.
In this article, we assume that you are already familiar with reCAPTCHA v3, NextJS, React, and fetch to call API.
Below are the steps:
- Sign up for API key pair
- Create a NextJS Application
- Add the key pair as environment variables
- Implementation
- Client
- Server
- Deployment
Sign up for API key pair
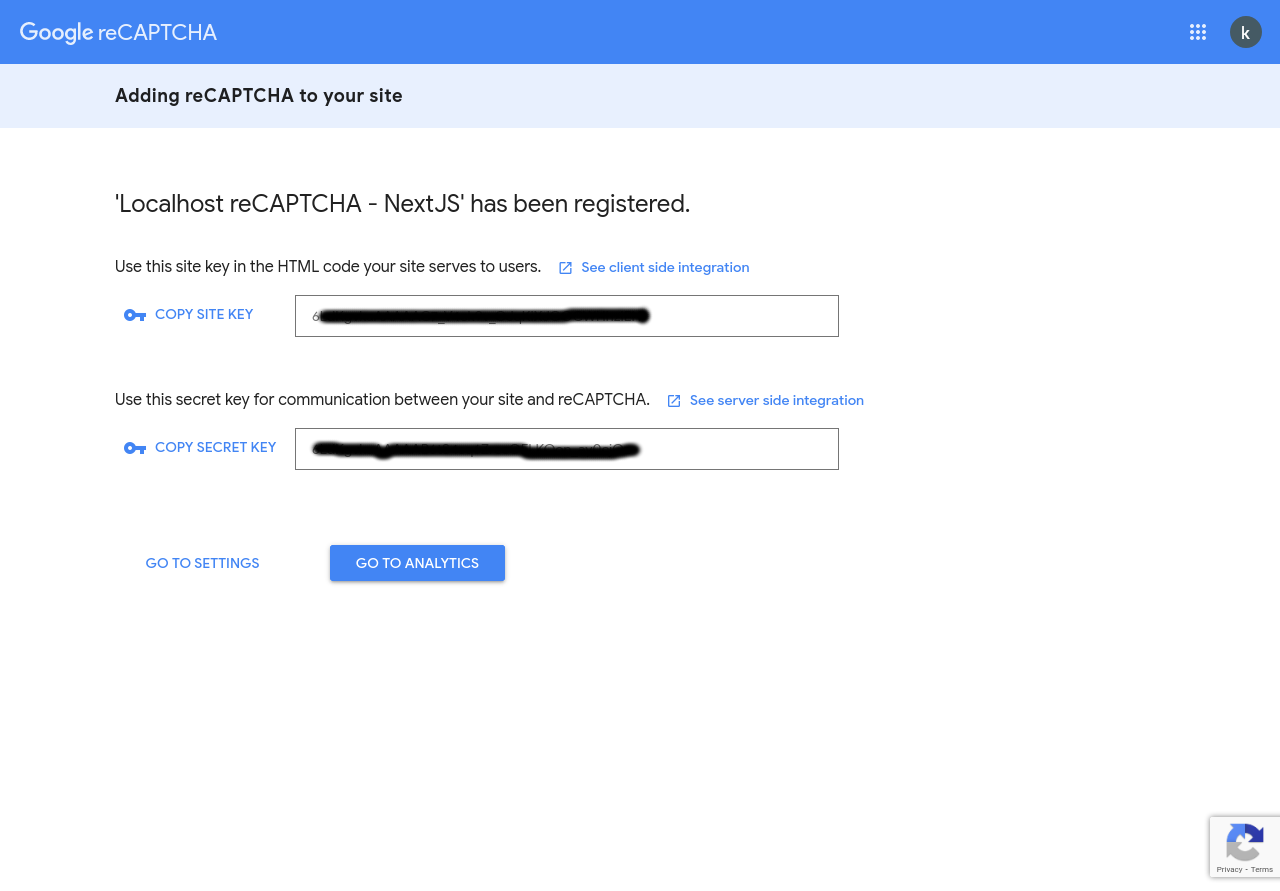
To start using reCAPTCHA, we need to sign up for an API key pair for our site. The key pair consists of a site key and secret key.
- The site key is used to invoke reCAPTCHA service on your site or mobile application.
- The secret key authorizes communication between your application backend and the reCAPTCHA server to verify the user's response.
The secret key needs to be kept safe for security purposes. It is why we will use environment variables in the next session to store the keys.
To sign up for an API key pair follow the steps below:
- Go to http://www.google.com/recaptcha/admin
- Click on the plus icon Create
- Give Label, choose reCAPTCHA v3 as reCAPTCHA type, add domain names of your site and accept the reCAPTCHA Terms of Service
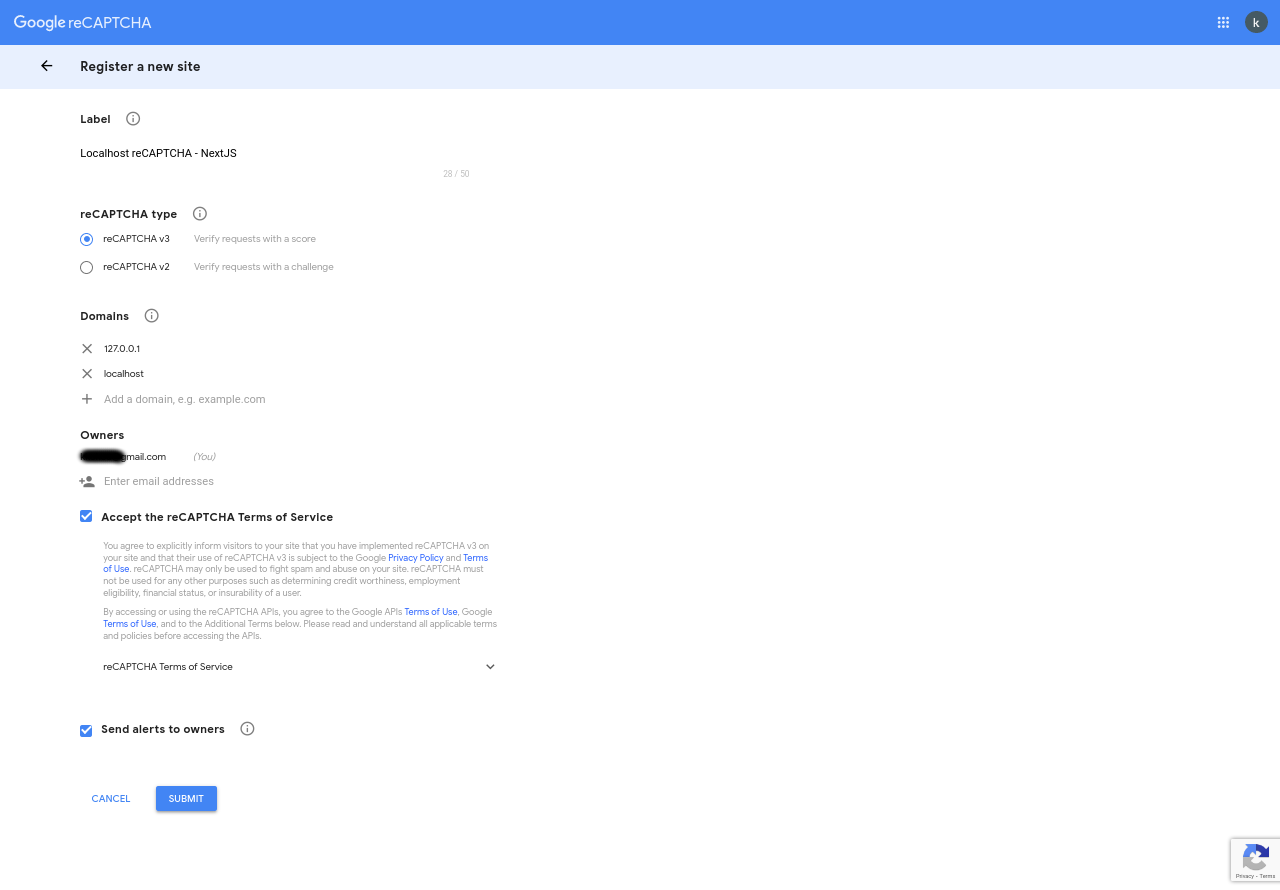
- Press the Submit button to create the API key pair.
Based on google's recommendations to create a separate key pair for testing environments, we will create two API key pairs, one for testing and one for production.
| Testing | Production (*) | |
|---|---|---|
| Label | Local reCAPTCHA - NEXTJS | reCAPTCHA - NEXTJS |
| reCAPTCHA type | reCAPTCHA v3 | reCAPTCHA v3 |
| Domains | localhost | url after deployment |
* We will use the production key pair during the deployment.
Create a NextJS Application
Since our goal is to implement reCAPTCHA v3 in nextJS, we need a NextJS application. We can create one using create-next-app which automatically configures everything for you. To create the project, run:
$ npx create-next-app recaptcha3-nextjs
Of course, you can also use an old Next.js project.
Add the key pair as environment variables
The key pair is very sensitive from a security point of view, especially the secret key. For this reason, we will be using environment variables to keep them in our application.
- NEXT_PUBLIC_RECAPTCHA_SITEKEY: will hold the site key and will be exposed to the browser, which is why it is prefixed with NEXT_PUBLIC_.
- RECAPTCHA_SECRETKEY: will hold the secret key.
This is what .env.local looks like
NEXT_PUBLIC_RECAPTCHA_SITEKEY=6LdKgxxxxxxxxxx_xxxxxx_xxxxxxxxxxxxxxxxx
RECAPTCHA_SECRETKEY=6LdKgxxxxxxxxxxxxxxxxxxxxxxxxxxx_xxxxxxx
The key pair in the above file is invalid. Please replace the key pair you generated for the test environment with the key pair from the above file.
In the implementation session, we will access the key pair (site key and secret key) respectivement with process.env.NEXT_PUBLIC_RECAPTCHA_SITEKEY and process.env.RECAPTCHA_SECRETKEY
Implementation
The implementation of reCAPTCHA v3 is divided into two stages. First, with the site key, we get a token from google on the client side of our application. And on the other hand with the secret key we check the token on the server of our application.
Client
Our application in which we will integrate reCAPTCHA, is a single page application with a simple registration form (name and email fields and registration button).
import Proptypes from "prop-types";
import { useState, useEffect } from "react";
import Head from "next/head";
import styles from "../styles/Home.module.css";

export default function Home() {
  const [name, setName] = useState("");
  const [email, setEmail] = useState("");
  const [processing, setProcessing] = useState(false);
  const [completed, setCompleted] = useState(false);
  const [submit, setSubmit] = useState("REGISTER");
  const [result, setResult] = useState({});

  useEffect(() => {
    setSubmit(() => {
      if (completed) return "RESET";
      if (processing) return "PROCESSING";
      return "REGISTER";
    });
  }, [processing, completed]);

  const handleSubmit = (e) => {
    //
    e.preventDefault();

    if (completed) {
      setCompleted(false);
      setName("");
      setEmail("");
      setResult({});
    } else {
      setResult({result: "Just Signed Up"})
    }
  };

  return (
    <>
      <Head>
        <title>reCaptcha v3 with Next.js</title>
        <meta name="description" content="reCaptcha v3 in Next.js" />
        <link rel="icon" href="/favicon.ico" />
      </Head>

      <main className={styles.main}>
        <h1 className={styles.title}>reCaptcha v3 with Next.js</h1>
        <p className={styles.description}>
          This shows how to use reCAPTCHA v3 with Next.js without any libraries.
        </p>

        <form onSubmit={handleSubmit} className={styles.form}>
          <div>
            <label htmlFor="name">Name</label>
            <input
              type="text"
              id="name"
              required
              value={name}
              disabled={processing || completed}
              onChange={(e) => setName(e.target.value)}
            />
          </div>
          <div>
            <label htmlFor="email">Email</label>
            <input
              type="email"
              id="email"
              required
              value={email}
              disabled={processing || completed}
              onChange={(e) => setEmail(e.target.value)}
            />
          </div>
          <div>
            <input
              type="submit"
              value={submit}
              disabled={!name || !email || processing}
            />
          </div>
        </form>

        <DisplayResult result={result} />
      </main>

      <footer className={styles.footer}>
        <a
          href="https://github.com/kokou2kpadenou/recaptcha3-nextjs"
          target="_blank"
          rel="noopener noreferrer"
        >
          Source Code
        </a>
      </footer>
    </>
  );
}

const DisplayResult = ({ result }) => (
  <>
    {result && Object.keys(result).length > 0 && result.constructor === Object && (
      <div
        className={styles.output}
        style={{
          backgroundColor: result.success
            ? "rgba(0, 0, 255, 0.1)"
            : "rgba(255, 0, 0, 0.1)",
          borderColor: result.success ? "#00f" : "#f00",
        }}
      >
        <div className={styles.result}>{`Registration ${
          result.success ? "successfull" : "failed"
        }`}</div>
        <strong>Output:</strong>
        <br />
        <pre>{JSON.stringify(result, undefined, 2)}</pre>
      </div>
    )}
  </>
);

DisplayResult.propTypes = {
  result: Proptypes.shape({}).isRequired,
};
At this level, we will need the site key that we stored in the environment variable NEXT_PUBLIC_RECAPTCHA_SITEKEY
...
import styles from "../styles/Home.module.css";

const SITE_KEY = process.env.NEXT_PUBLIC_RECAPTCHA_SITEKEY;

export default function Home() {
...
Now we need to load the JavaScript API of reCAPTCHA v3 with the site key using the NextJS Head component. Starting with NextJS version v11.0.0, you can also use Script Component instead of Head Component for load performance.
...
return (
<>
<Head>
<title>reCaptcha v3 with Next.js</title>
<meta name="description" content="reCaptcha v3 in Next.js" />
<link rel="icon" href="/favicon.ico" />
<script
src={`https://www.google.com/recaptcha/api.js?render=${SITE_KEY}`}
/>Then, when submitting the form, we run the google reCAPTCHA. Then we will send the token we received from Google with our data (name and email) to our API for verifcation.
...
    if (completed) {
      setCompleted(false);
      setName("");
      setEmail("");
      setResult({});
    } else {
      setProcessing(true);

      window.grecaptcha.ready(() => {
        window.grecaptcha
          .execute(SITE_KEY, { action: "submit" })
          .then(async (token) => {
            /* send data to the server */

            const body = {
              name,
              email,
              recaptchaResponse: token,
            };

            try {
              const response = await fetch("/api/register", {
                method: "POST",
                headers: { "Content-Type": "application/json;chaset=utf-8" },
                body: JSON.stringify(body),
              });
              if (response.ok) {
                const json = await response.json();
                setResult(json);
              } else {
                throw new Error(response.statusText);
              }
            } catch (error) {
              setResult({ message: error.message });
            }

            /* End of the sending data */

            setProcessing(false);
            setCompleted(true);
          });
      });
    }
...
The finaly code can be found here
Server
Each reCAPTCHA user response token is valid for two minutes, and can only be verified once to prevent replay attacks. If you need a new token, you can re-run the reCAPTCHA verification.
After you get the response token, you need to verify it within two minutes with reCAPTCHA.
So to verify the token, we will send a request to google reCAPTCHA with our secret key and the token obtained from the client user as the payload. This will be done in our API named register in the /pages/api/register.js file see the content below.
export default async (req, res) => {
  const SECRET_KEY = process.env.RECAPTCHA_SECRETKEY;

  const { name, email, recaptchaResponse } = req.body;

  const verifyUrl = `https://www.google.com/recaptcha/api/siteverify?secret=${SECRET_KEY}&response=${recaptchaResponse}`;

  try {
    const recaptchaRes = await fetch(verifyUrl, { method: "POST" });

    const recaptchaJson = await recaptchaRes.json();

    res.status(200).json({ name, email, ...recaptchaJson });
  } catch (e) {
    res.status(400).json(e.error);
  }
};
Deployment
The easiest way to deploy your Next.js app is to use the Vercel Platform from the creators of Next.js.
During deployment, we will create the environment variable NEXT_PUBLIC_RECAPTCHA_SITEKEY and RECAPTCHA_SECRETKEY using the production key pair created above.
Check out our Next.js deployment documentation for more details.
Below the result after deployment.
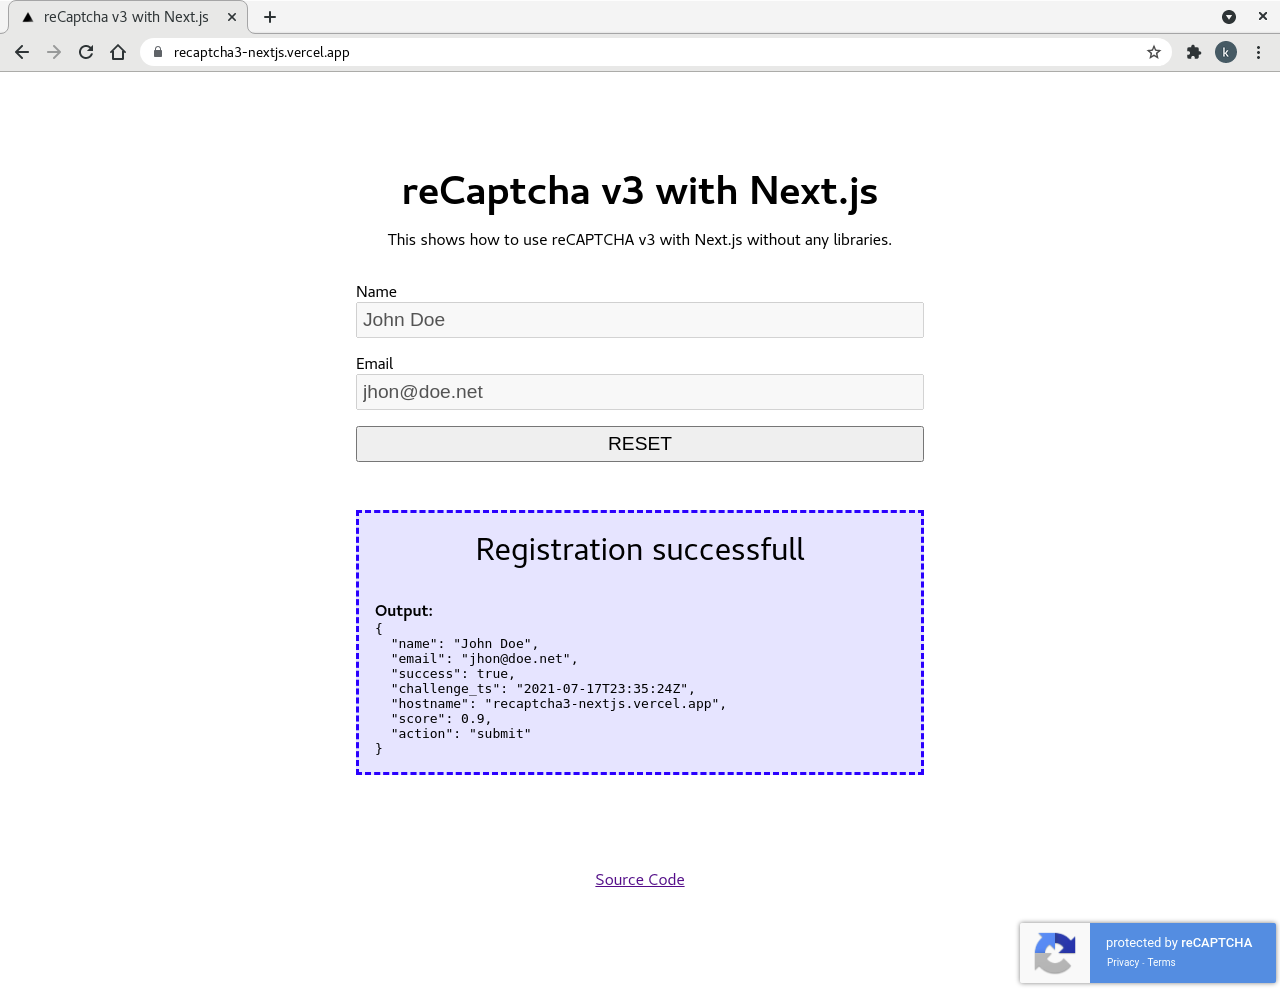
All the code can be found in this repository and you can see the demo here.